Bringing you helpful, informative articles for your home
Home Appliances - Dryer Repair
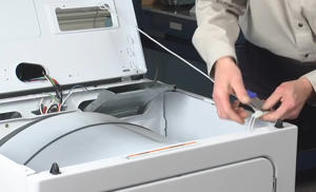
Today, in the first in our series of articles on home appliance repairs, we’ll be looking at a Whirlpool brand dryer repair. We’ll start by looking at the inside of the dryer, and then what kind of repairs we may need to do to get it properly working again.
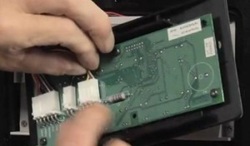
The rollers in a dryer are held in place by two plastic clips. The left side roller has a support bar held by a press-on clip that can be removed by working it side to side while applying pressure from behind with a flat head screwdriver. Try not to put it through your other hand in the process. Sometimes, if you are careful not to bend these clips, the triangle clips may be reused, but they usually require replacement after being removed. Let’s pull the burner cover and get it out of the way. It is held in place by two 5/16” screws. Once these have been removed tip the cover up and pull it free from the bulk head tab. In some cases the roller shafts may become ground down or misshapen, if you’ve been tolerating a grinding or squeaking noise for a long period of time. The support roller shafts need to be perfectly round. It’s also important to not apply lubrication to the roller shafts. Lubrication tends to attract dryer lint and debris that creates unwanted friction and heat on the rollers. To replace the roller shaft remove their mounting nut from the rear of the dryer, remove the bad shaft, and replace it with a new one in the same manner. Two strips of nylon material, called the drum bearing, support the front side of the dryer’s drum. They’re held in place by a few expanding clips that snap into the drum’s edge. The drum’s bearing slides over a strip of felt, called the door felt, which is attached to the inside of the dryer’s door. The bearing material or the door felt can become ground down if the drum is not installed properly and lead to grinding noises. In extreme cases that are ignored for a long period of time, unrepairable damage can occur. When reinstalling the drum be sure that the drum’s bearing is riding on top of the door felt. Another common source of noises is the rear dryer felt. The rear felt helps to reduce friction and noise caused by the drums rotation as well as acting as an air seal, which helps to maintain proper dryer air flow. When reinstalling the drum take a moment for a few rotations. Inspect for any points where the rear felt may be folded under and correct them. Now on to the dryer burner. The burner has several wires connected to different components: the igniter, the coils, the flame switch. Again, for more detailed information about each of these components see our article on DIY Dryer Repair. The flame switch is held in place by one 5/16” screw. After this screw has been removed it can be lifted from a small tab slot cut into the side of the burner tube. Use caution when disconnecting the flame switch. Support the terminals with a pair of needle nose pliers while you work the wires off. Now let’s remove the igniter and the coils. To remove the burner coils, first disconnect the wires attached to them. There are small bumps on the coils that guarantee proper placement of the first and secondary burner coils. Then simply lift the coils from their posts. On to the igniter… The igniter is mounted to a plate that is attached to the burner tube. You can remove this plate with two 5/16” screws, but I prefer to loosen the 5/16” screw that holds the igniter to the mounting plate. Use caution not to touch the igniter while handling. It is extremely delicate and the oils in your skin can shorten its life expectancy creating hot spots. Some older models have a gas shut-off valve and a burner disconnect nut to disconnect the burner. Most newer models do not have this. This pipe is bent and held to the back of the dryer by a barbed clip and a 5/16” screw. If you have a disconnect nut it will loosen by rotating the top of the nut towards the front of the dryer, clockwise from the burner’s perspective. The burner base is held to the floor of the cabinet by a few 5/16” screws. Once they have been removed you can remove the burner. This fitting is called the gas orifice. Swapping out these two fittings is all that is required to convert this style of dryer from natural gas to propane, also known as LP. The orifice fitting removes counterclockwise with a 3/8” wrench and the regulator cap removes counterclockwise with a flat head screwdriver. Sometimes the air bath will also require minor adjustment. Detailed instructions are supplied with the LP conversion kit, part number 49572. Next we will pull the dryer’s blower and the motor. The blower is directly attached to the reverse side of the motor. To remove it we will first need to pop the rear retaining clip by using a flat head screwdriver to compress the clip down, while at the same time using the leverage of the screwdriver to pull the clip free from the tab that it is attached to. This will expose the square portion of the blower that is threaded on to the rear motor shaft. This is a relatively soft plastic nut that surrounds a smaller internal nut that threads on to the motor. It is very easy to strip and create a lot more work for yourself, so watch and listen carefully. With a 7/16” wrench grab behind the front of the pulley where the belt would rest. There is a one-sided flat spot for you to mount your wrench. Use a 13/16” wrench, or a large crescent wrench, to hold the blower. You can then use the right side roller support as a stop. Now this is where some technique is needed. The front side wrench needs to turn in a clockwise direction to release the blower on the back side of the motor. If you turn it too slowly the wrench on the blower side will strip the plastic surrounding the internal nut and you will be required to chisel the blower off to replace it. Turn the shaft until the rear wrench locks up against the right roller shaft. Then with one fast movement turn the front side wrench clockwise. This should free the blower. Now with the blower off of the motor we can remove the front motor retaining clip in the same way that we did the back one earlier. Notice that the points where the motor contacts the mounting points there is a small indentation that ensures proper motor position. The motor mounting clips are nearly impossible to install if the motor is not positioned properly into these slots. At this point the blower wheel is free from the motor and can be removed. Next let’s look at how to reinstall the drum. Using the belt as a handle, carefully slide the drum back into place. The indentation on the back of the drum needs to rest down on the support rollers. It’s nice to have someone else hold the drum up into place while you reattach the belt, however, if no one is available, your shoulder can work just as well. The belt needs to be sitting in the same spot on the drum where it was before. With years of use the belt generally will create a mark on the drum, giving you a very good idea as to where it needs to be positioned for the idler pulley. If the belt is out of place it will roll off of the idler pulley in a few turns. Once the belt is on properly, push the drum back into place. Remember to check the rear felt for folding. Next install the dryer’s front panel. It should set down into two clips mounted on the folded side panels. Then, tip it up into place. The drum bearing needs to be on top of the door felt. Give the drum a few turns to ensure proper placement then reinstall the two 5/16” screws that hold everything into place. Now on to the console With most designs the internal components within the console can be accessed by removing the rear panel of the console attached with a few ¼” screws. This will allow for testing and removal of console parts. So that about sums it up. We’ve seen how it all comes apart. You can learn more about common heating and noise related problems, and other articles about appliance repairs, feel free to visit our friends at Best Appliance Repair Scottsdale (www.appliancerepair-scottsdale.com). |
|
Repairing a Refrigerator Ice Maker
*this article was originally posted on the website Best Appliance Repair of Austin.
Today we are going to show you how to put a solenoid in your ice dispenser, which is actually a really easy job. All we are going to need is a Phillip’s screw driver. Let me show you how it’s done.
Before we begin this repair, first thing we are going to do is disconnect the power to the refrigerator. We are going to be working around a electronic circuit board and we don’t want to take any chances, so disconnect the power first.
Next we need to remove this trim panel from around the dispenser, there’s four tabs on each side, we need to press the dispenser towards the centre, this engages the tabs, and remove it.
Next we are going to lower down the control panel, just we are going to push up on it and pull out at the bottom. We can disconnect these wire harnesses, set the control panel aside.
Next we have four Philips screws one in each corner of that assembly, we need to remove those, remove the housing that gives us the access to our solenoid located in the upper right hand corner. There’s, three Philip’s screws that hold that in place, we are going to remove the bottom two and loosen the top one.
Remove the solenoid the plunger will stay connected to the ice maker door, just we have the door pulled around and unhook the plunger from it. Take our new plunger, again open the door, put in the plunger. Install the new solenoid by lining up the plunger with a hole in the solenoid, slide the solenoid into place, reinstall those two bottom screws and tighten the third one on the top. Make sure the door opens and closes freely. (video originally posted on YouTube by user: PartSelect) Put the housing back in place. Make sure it fits over the water tube freely and that we are not pinching any harnesses. Reinstall the four screws that hold that in place. Now we’ll connect the wire harnesses with the control panel again.
Install the control panel by hooking the top into the housing, pressing upwards on it and locking the bottom. You can put the trim piece back on, just snaps into place, four on each side and our repair is complete.
That’s how you put a solenoid assembly into your refrigerator. Thanks for visiting and good luck with your repair.
Fixing a Leaky Toilet
Hear that? It's the dreaded sound of water running in the toilet tank.
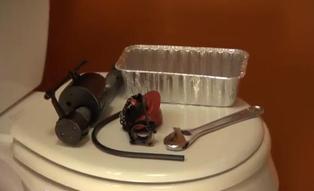
A toilet that won't stop running isn't just annoying -- it costs you money. The fix is usually to replace the fill valve and flapper assembly, and here's how it's done.
For starters, head down to the hardware store or your local Home Depot or Lowe's and pick up a standard fill valve kit. Also, round up a pair of pliers and a small bowl or pan.
Next, shut off the toilet's water supply. If your house is less than 20 years old, there should be a shutoff valve for every toilet and faucet. But if your home is older, you may actually have to shut off your home's main water supply.
Place the pan underneath the shutoff valve before it's disconnected, then try to drain as much water as you can out of the tank before disconnecting the supply hose. This will minimize the amount that will drain out when you start taking out the old pieces.
Unscrew the supply house. This can usually be done by hand. If not, use the pliers. There's another bolt holding the old fill valve in place. Remove that as well. Now you're ready open up the top of the tank and remove the old fill valve.
Start by removing the overflow tube, then pull the old unit out (you can place it right there in that pan… see how handy that pan is?)
Next, remove the old flapper valve. This is connected to the bottom of the tank and also attached to the flush handle with a small hook. The flapper is often the culprit in a leaky toilet. You’ll probably notice how the rubber has deteriorated over time.
Lay the old flapper assembly next to the new one and use it as a guide for where to set the hook that connects to the handle. That way, you make sure that the new flapper will operate just like the old one when you flush.
Snap the flapper assembly back in place and attach the chain to the handle.
Next, adjust the new fill tube's height to the manufacturer's specs, then cut and attach the new overflow tube. Now you're ready to install the new fill tube.
Your kit comes with appropriate adapters and connecting nuts so just follow the instructions and use the old tube as a reference. Put the fill tube in the tank and slide the overflow valve onto the overflow tube. Make sure to firmly hand-tighten the lock nut to the base of the fill valve. But don't tighten it too tight, because it's made of plastic and you don't want it to break.
Now, attach the water supply line, again hand tightening until it's good and firm, but not over tightening.
Finally, test your work by turning the water back on. Once the toilet tank is fills, there should be no leaks, and best of all no sound of running water!
Renovation Considerations
 Kitchen Renovations
Thinking about renovating your home? Here are four things you should consider before taking on any remodeling project.
If you only plan on staying for two or three more years, you might not be able to earn back the money you'd put into major renovations. But smaller projects, like painting, refinishing the floors and updating your hardware will all add appeal without busting your budget.
If you plan on staying in your home for five years or longer, a kitchen or bathroom renovation will give you the best return on your investment. But it's still important to stay on a budget. A good general rule is not to spend more than 25% of the current value of your home on renovations.
Once you've decided on a plan, you need to line up financing. Start by getting estimates from multiple service pros, then decide how you will pay. For example, will you apply for a home-equity line, tap into savings, use a credit card? Choose the option that'll work best for you.
And before you start on any project, make sure the contractor and subcontractors you hire have adequate insurance. Your contractor should carry worker's compensation insurance to cover workers who get injured on the job -- otherwise you may be liable.
And if you plan on expanding your home, you may need to increase your homeowner's coverage. And remember to hold onto all your receipts during the remodel, to make sure all your personal items are covered in case anything happens.
Finally, remember that some renovations can actually cut the cost of owning your home. New plumbing or electric wiring can lower your insurance premiums. Updating windowpanes, adding more insulation or installing solar panels can lower your energy bills.
To help you get a handle on the average cost of each potential upgrade, you could use the CostAdvisor application that is provided by HomeAdvisor. Just enter the basic info, and it'll give you a price estimate for the work you want to do. That's pretty cool!
More helpful articles coming soon!...
Check back often as we will be posting more great, informative articles to help you with your projects around your home. If you don't see anything posted here, check our Home Repair And Renovation Blog page.
